Tuesday, 25 September 2018

Week 27 (FYP 2): Final test for the project

OBJECTIVE: 1. To test the full project.
            2. To take a video for the project.

METHODOLOGY: 1. Turn on the personal hotspot at smartphone so that the blynk apps can be connected.
             2. Connect the nodemcu with power supply but i used powerbank.
          3. Set the timer at the blynk.

RESULTS:

Video 1: Final test for the project

ANALYSIS & DISCUSSION: I tested the full project as a preparation for my industrial day. In the video, we can see that my project is well function. When the soil is dry, the sensor will detect it and it will triggered the motor. The led of the sensor is turned on when the sensor detected the water. 

CONCLUSION: All the objectives are achieved. Next i can focus on the poster for my presentation. 

Thursday, 20 September 2018

Week 26 (FYP 2): Use Adapter as a power supply

OBJECTIVE: 1. To use adapter as a power supply for this project.
          2. To have a suitable voltage that can make the project well function.

METHODOLOGY: 1. I buy adapter through online to make it as a power supply.
           2. Connect the adapter with the relay and the motor.
            3. Adjust the voltage of the adapter to 10 V.

RESULT:

Figure 23: Adapter as a power supply

Figure 24: Cable used for the adapter


ANALYSIS & DISCUSSION: Before this i used battery 9V as a power supply. But then when i met my supervisor, he advised me to use adapter as a power supply. So i decided to change the supply from a battery to the adapter. The adapter supply 12 V. I adjust the voltage of the adapter to 10 V. This is because when i use the bigger voltage, the motor moves so fast and it caused the water to come out fast. The sensor cannot detect well when the water come out too fast. That is why i adjust the voltage to 10 V.

CONCLUSION: Finally for the project, i used adapter as the power supply to replace the battery. The objectives have been achieved.

Wednesday, 12 September 2018

Week 25 (FYP 2): Set up Blynk Apps

OBJECTIVE: 1. To create an account of blynk on the smartphone.
           2. To set up the controllers that i need in the blynk.
           3. To test the apps with the project.

METHODOLOGY: 1. Download the Blynk application at app store with free.
             2. Register and create an account at blynk using the title 'Plant Watering System'.
             3. Identify the controllers that needed for this project, so that, i can cotrol the system using the blynk app.              4. Test the app with the coding and the hardware.

RESULTS: 
Figure 22: Blynk app on the smartphone

ANALYSIS & DISCUSSION: At the blynk apps, i set up the timer for morning and evening/night. Users can easily set their time to water the plants in case they missed to water their plants during the day. The sensor will detect the moisture of the plants and notify the users. I set the notifications on the apps so that users will easily notified if their plants need water. When the led of sensor is turned on, it means that the sensor detect the water. 

CONCLUSION: I have create an account for blynk and the system funcion well. All objectives are achieved for this week. 

Thursday, 23 August 2018

Week 22 (FYP2): Testing NodeMcu (ESP8266)

OBJECTIVE: 1. To test arduino nodemcu whether it is function or not.
            2. To make sure nodemcu and the coding suits well so that the system can function.

METHODOLOGY: 1. Test the nodemcu using serial monitor using arduino software.
             2. Burn the coding into the nodemcu.

RESULT: 


Figure 21: Test the nodemcu before connect it with other component


Figure 22: Coding used to test the nodemcu


ANALYSIS & DISCUSSION: Nodemcu can connect with Wifi using the coding and it shows that nodemcu can function well. For next step, i can proceed with the connection on hardware of this project. 

CONCLUSION: Nodemcu has been tested and it can function. All objectives have achieved.


Thursday, 16 August 2018

Week 21 (FYP2) : Coding for Plant Watering System

OBJECTIVE: 1. To have a coding in order to do this project. 
                   
METHODOLOGY: 1. Understand the flow for this project.
                  2. Do a research on how to do the coding for this system.
                3. Connect the coding with nodemcu to know if the coding is well function or not.

RESULT: 
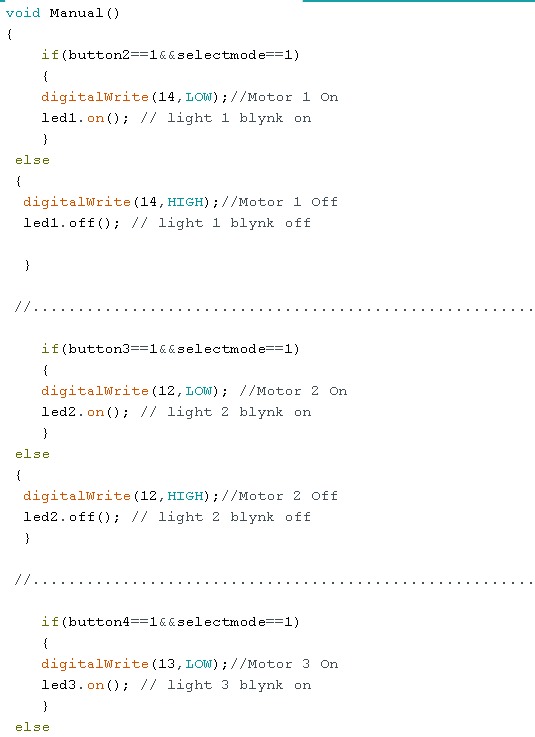
This is the coding for plant watering system:


ANALYSIS & DISCUSSION: This is the coding for my project which is plant watering system. After i have done with the coding, i burn it into the nodemcu to know if the coding function well and suitable with the arduino or not. Fortunately my coding fit well with the nodemcu and this system.

CONCLUSION: The coding for this project has been done.

Thursday, 9 August 2018

Week 20 (FYP2) : Connection for plant watering system

OBJECTIVE: 1. To have a figure on the connection of plant watering system.
           2. To make it more easier to follow the steps on how to connect the circuit for this project.

METHODOLOGY: 1. Do a research on the connection of this project.
             2. Understand the connection and the function of the hardware/components.

RESULT:
 This is the connection for my project:

Figure 19: Connection for plant watering system

DISCUSSION & ANALYSIS: Before i proceed with the hardware, i sketch the connection for this project using fritzing software. I download it at http://fritzing.org/home/ for free.

CONCLUSION: The objectice are achieved and i have sketch the connection for my project so that it will be easier for me to proceed with the hardware. 

Wednesday, 8 August 2018

Week 19 (FYP2) : Compare the price of the components

OBJECTIVE: 1. To identify the best price offered for the components.
               2. To buy the affordable price for the components.

METHODOLOGY: 1. Identify the store that sell the components.
                   2. Compare the price for each of the components between the stores.
                   3. Check the price through online and compare the price with the store.

RESULT: I found the components at the best price.


Picture 19: List of main components and its price


ANALYSIS & DISCUSSION: I bought the components with affordable price and within the budget which is the total of the cost not exceed RM 500. But, for this week i only buy the main components because i want to focus setting up the components on the breadboard.

CONCLUSION: The objectives are achieved as i found the store that sell the components with affordable price.